First Steps with Pharo Smalltalk (a beginner’s tutorial)
Having played a little (really, only a little) with Pharo, I decided maybe I can give the smallest of introductions based on my own experience so far. Smalltalk environments like Pharo and Squeak can be quite daunting, regardless of whether you are coming from a programming background or not. I will try to keep opinions and general ramblings to myself here.
Introduction
Smalltalk is an object-oriented language dating back to the 1970s. It has a very ardent following and, although it has a steep learning curve, it is fun to learn once you get into it. It has also had a big influence on several other languages like Ruby.
Some things to know before you start:
- The Smalltalk environment is a running system in which you write and execute code, all the while changing the system itself
- Everything is an object; you can pretty much debug and inspect everything
- Everything can be changed; the environment is extremely malleable with great introspective capabilities
- Although Smalltalk has methods, we don’t talk about “calling methods” in Smalltalk. Instead, we “send messages” to objects.
- The Smalltalk environment offers a lot but comes with a steep learning curve; it can be overwhelming at first
- You may experience nausea or headaches at first, but that goes away; you may find yourself addicted very quickly
I should caution you up front that I am a Smalltalk (and, for that matter, Pharo) newbie. But I thought that I should write up what I learned before I get too deep into it, so that my experiences are still fresh in my memory and I can hopefully relate them in ways that will be useful to you.
Installation
To begin, you need to download an installation of Pharo for your platform (assuming it’s one of Mac, Linux or Windows), which you can get from the website, here:Â http://pharo.org/web/download.
Once you have downloaded it, extract it to the folder of your choice. When you open up the folder, you will see something like this:
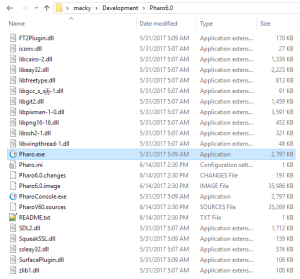
On Windows, you can double-click the Pharo.exe executable to start Pharo. That’s it – installation done!
Looking Around
When you start Pharo for the first time, you should be greeted by the following:
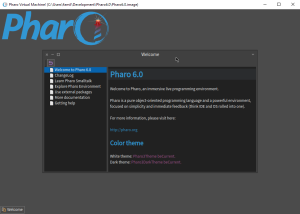
Here we see a Welcome window containing some help. At the bottom is a task bar showing the windows, for now just containing an icon for the single open Welcome screen. If you prefer a light theme instead of the default dark, click the “Pharo3Theme beCurrent.” link, to change it. (I changed mine, so the following screenshots will all show the light theme).
The Pharo window looks like a mini desktop; it is in fact a little desktop environment of its own. It doesn’t interact with the desktop of the operating system, so if you want to, you can change to full screen mode.
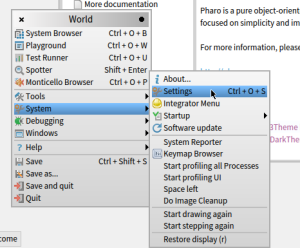
Clicking anywhere on the desktop brings up the World menu. From this menu, select System > Settings. There is a shortcut assigned to this, as you will see, which is Ctrl + O + S. As an alternative to using the World menu, hold down Ctrl, then press ‘O’, let go (while holding Ctrl) and press ‘S’. There are menu useful keyboard shortcuts, and we will discuss a few here.
In the Settings Browser window that opens, look under Appearance > Desktop, and select “Fullscreen Mode“, which switches the window to fullscreen mode. Optionally, tick uncheck “Show logo…”. You can of course play around with the settings and adjust the environment to your heart’s content.
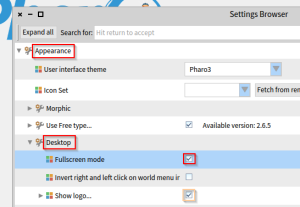
In the search field at the top, type in ‘author’. You should see a setting called “Author identification” being the only one shown. Replace the placeholder text (“VincentVanGogh”) with your own name. (We’re setting it now to avoid the system asking you later when we start to code classes).
Not how, when you typed in the field, the little orange indicator appeared (highlighted in the picture) which indicates that the field has changed. You will see this a lot in Pharo. As the message at the bottom of the screen indicates, you can just hit return (or ‘enter’) to accept the change. For multiline entries, you can press Ctrl+S (accept) or use the context menu.
If you look at the window, you will see there are three window buttons in the top left. As with typical desktop windows, you can close, maximise/restore or minimise the window. If you maximise the window, you will notice that it does not cover the whole desktop, but leaves some space around it. This allows you to access the desktop and world menu even though the windows it contains are maximized.

Once you have finished, close the Settings Browser by clicking the ‘x’ in the top left or the window or pressing Ctrl + W. You can close any window with the Ctrl+W shortcut.
If you want to exit at any point, bring up the World menu and select “Save and Quit” if you plan to carry on where you left off, or just “Quit” if you want to discard your changes. (If you went full screen, you can also use Alt-Tab to switch windows on your OS desktop).
Starting to code
Now let’s start coding, with the simplest of examples. To do this, we are going to open two windows: one is a Playground window, which is basically a place to enter and evaluate code, and the second is a Transcript window, which is akin to a system console. We are going to write something to this console by evaluating code in the playground window.
Click the World menu and select “Playground”, or press Ctrl + O + W. This opens up an empty playground window, into which we will be entering some Smalltalk expressions and evaluating them.
Now open a Transcript window, either from the World menu (Tools > Transcript) or by pressing Ctrl + O + T and position the window next to the playground window.
In the playground window, enter the following:
Transcript show: 'Hello Pharo!'.
Now, select (highlight) the code you just entered, then right-click (context-click) and note that there are a few options in the context menu:
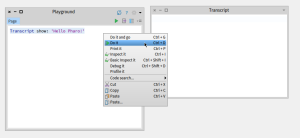
For now, we are just going to select “Do it” (the shortcut for that is Ctrl+D). When you do, you will note that the text ‘Hello Pharo!’ appears in the Transcript window.
There are three primary ways to evaluate code in Smalltalk which we will mostly use:
- Do it (Ctrl+D): Evaluate (execute) the code
- Print it (Ctrl+P): Evaluate and print the result of the code
- Inspect it (Ctrl+I): Evaluate the code and open a new Inspector window which you can use to analyse the result
Let’s try another one. Don’t worry about deleting the existing code. Just carry on, on a new line. Type or paste the following code, then highlight it.
5 factorial.
Now, again evaluate it with “Do it”, or rather use the shortcut Ctrl+D. It seems as if nothing happens. Actually, Smalltalk has evaluated the code, but you didn’t see the result. Now highlight the code again, but this time, press Ctrl+P (print). This time, the result of the code prints out next to the statement. There is also a little icon, a pair of glasses, next to the result. You can click this to inspect the result in more detail.
To dismiss the printed evaluation, press Backspace or Escape or click away from the statement.
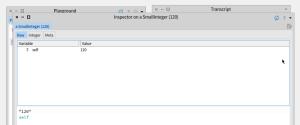
Evaluate the statement again, this time pressing Ctrl+I (inspect), and look at the window that opens.
Here you can start inspecting the result. Depending on what you are inspecting, the result will look different. From here, you can also navigate to more detail about objects, etc.
One important thing to note is that you can enter expressions and evaluate them in just about any window in the Smalltalk environment. You could have entered the expression in the Transcript window and evaluated it there and, in fact, you will see that you can do it in other windows.
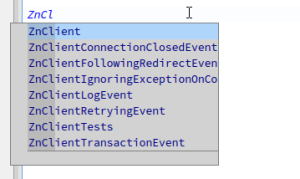
You may have noticed, as you type into the playground editor, that the system offers you auto-complete suggestions as you type:
Needless to say, this can be quite helpful when you don’t know what exactly you are looking for, but you should be aware that it is case-sensitive.
Some Basic Smalltalk Syntax
Smalltalk (in Pharo anyway) has only 6 keywords (reserved words): self, super, nil, true, false, thisContext.
The primary unit of expression in Smalltalk is the statement. A statement begins with an object, followed by a message (we typically call these methods in other OO languages), several messages or chained messages and ending with a full stop. If you are evaluating a single statement, the full stop is optional, but if you have several statements following each other, you need the full stop to tell Smalltalk where one starts and the next finishes.
Objects and consecutive messages are separated by spaces. (If you’re like me, you keep typing ‘.’ or some other separator from being used to Ruby or other such languages. Forget those; it’s spaces all the way, baby).
In the first example above, Transcript is an object known to the system, and we sent it a messsage called ‘show:’, followed by a parameter. There are three message types in Smalltalk:
- Unary messages: These are single messages to objects without parameters. Sending ‘factorial’ to a number is an example.
- Binary messages: These are messages that are written between two objects and are typically operators like mathematical operators, comparison operators, etc.. An example would be ‘+’. If you write ‘2 + 3’, you are sending the message ‘+’ with a small integer (3) to another small integer object with the value 2.
- Keyword messages: These are messages ending in a colon (:) which indicates that they take a parameter. You saw an example of it when you sent show: with a string parameter to the Transcript object earlier. You can have multiple keyword messages passed to an object; the combination of keyword messages provides a method signature called a selector
When you send a message to an object, the system evaluates it and produces a result. You can send another message to the result, and have consecutive messages being sent to each result in turn. However, if you want to send multiple messages to the same object, you can chain those together with a semicolon (;), like this in what is called a cascade:
Transcript cr; show: 'That''s nice!'; cr
What happens here is that the message ‘cr’, ‘show:’ (with a parameter) and again ‘cr’ are being sent to the Transcript object in turn (‘cr’ causes a carriage return to be printed). Without the semicolon, the system would try and send ‘show:’ to the result of ‘cr’ and that would fail. (Note how the single quote escapes itself in a string – I recognise this from ABAP!)
You have probably noticed that a string is represented by a series of characters in single quotes. Any text in double quotes, on the other hand, is treated as a comment and is not evaluated by Smalltalk. Try it; you will find that it just evaluates to nil.
"This is a comment. The system ignores it, but it's good for readers of code!"
Variables are declared before they are used: you can put one or more variable names between pipes (e.g. |var1 var2 …|). In the playground, however, you can assign variables without first declaring them.
To assign a value to a variable, use ‘:=’ (‘=’ by itself compares two values). Let’s try with an example. Copy and paste the following two lines into the playground window, select them and evaluate them:
page := ZnClient new get: 'https://ceronio.net'.
Transcript show: page.
If all went well (and I see no reason why not, unless you’re behind a proxy), then you should see the raw HTML of the front page of this website appear in the Transcript window.
You should understand that new is not a syntax construct; it is not a keyword of the language. It actually sends a message to the object, instructing it to make an instance of itself; the implementation for this method is defined in a base class of all classes.
The last thing you should know about, before we look at two more syntax constructs, are symbols. A symbol is a kind of string, more of an identifier really, which you can use for comparing values. They are written with a preceding hash like ‘#local’ or ‘#global’. They are useful because, unlike strings, you can use a symbol as an identifier which will always be guaranteed to be equal to the same symbol. That is not true for strings; even strings comprising the same text could be different objects in memory, so they cannot be reliably compared. (Try sending the message ‘hash’ to an object, e.g. “#lucky hash” to see the unique identifier for the object).
#lucky hash = #lucky hash. "This will always be true"
More Syntax: Array and Block by Example
Two more important constructs of the language syntax are literal arrays and blocks. Let’s look at an example that employs both:
#('talk' 'a' 'little' 'louder') collect: [ :word | word asUppercase ]
The brackets preceded by a hash and containing some items make a literal array (that is, you don’t have to instantiate the Array class and add items with messages; the language provides a special syntax for it). Here we defined an array with four strings.
Next, we send the ‘collect:’ message (a keyword message) to the array, which takes a block as an argument.
A block is a piece of code in square brackets. It contains statements that are not executed by default. Blocks act as closures; this makes them useful for passing code around between objects for evaluation (you may have come across the idea in other languages, where you can pass functions around, like in Javascript, or lambdas in functional languages). You can evaluate the code in a block by sending it the value message. In fact, what happens above is that the ‘collect:’ message will take the given block and evaluate it for each element in the array.
Blocks can receive a list of variables as input at the start, each prefixed by a colon. The rest of the code after the pipe (|) is the code that will be evaluated. So in the block above, a variable called ‘word’ is declared. The statement following the pipe takes the value passed to it (which will be a string) and transforms it to upper case.
If you evaluate the entire statement above, you will get back a new array in which each of the strings has been capitalised.
Just for laughs, try highlighting only the block or only the array and inspect each in turn, just to see how the system sees each of them.
Inspecting the environment with the System Browser
As I said at the start, the Smalltalk environment is a running system. The environment is preloaded with a large number of classes. Smalltalk offers a tool called the System Browser with which you can inspect the system. (This is an important tool, so we’re talking about that for a minute).
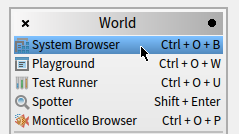
We could open the System Browser from the World menu; in fact, it’s the very first item on the list. (You can use, and should memorise, the shortcut Ctrl + O + B to open it). But we’re going to go a bit of a roundabout way to get to the System Browser:
Navigating to the System Browser from an Inspector
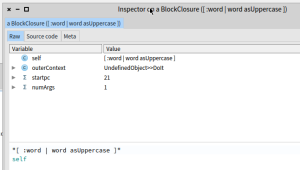
With your example code in the playground open, highlight the block (the bit that reads “[ :word | word asUppercase ]”) and inspect it (Ctrl+I). If you did it already from the suggestion above, you would now have an inspector window from evaluating the block, showing the following inspection on the BlockClosure object you just inspected, where under the “Raw” tab, you see the variables of the object:
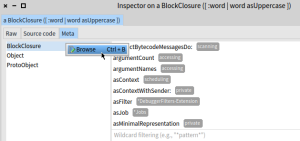
Now switch to the “Meta” tab:
On the left you see the list of classes in the BlockClosure class hierarchy. On the right is a list of methods defined for the selected class. If you click on the “BlockClosure” entry on the left, then press Ctrl+B (or right-click and select the same option), a new System Browser window opens.
Looking at the System Browser
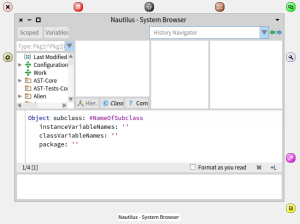
OK, I took you the long way round to get to the System Browser, but it’s good to know that there are multiple ways of inspecting and accessing values in the system. Now that we have the browser open in front of us, let’s look at what it give us:
This may not be the most intuitive tool to use, but it’s quite powerful, and it will allow us to create classes and methods as we will see further on. For now, we’re just going to use it to examine the system.
On the top row, first we have a list of packages. Classes are organised in packages. If you select a package, the list of classes belonging to the package is shown in the next pane. Selecting a class, in turn, allows you to see the methods it defines, which is what the next two panes are about. Note that clicking on a class alternatively selects and deselects it. When a class is selected, you see its definition in the code pane below.
Methods are grouped by their function; these groups are called protocols (sounds more mysterious that in it), which you see in the third pane on top. This grouping is (I think) a rather arbitrary categorisation as you can assign methods to protocols as you choose. You can click on the “– all –” pseudo-group, or browse methods by their protocol, which gives you some idea of the kind of functionality you can expect.
Take note also of the three toggle buttons below the class list, labeled “Hier.”, “Class” and “Com.” respectively. The first, when selected shows the inheritance hierarchy of the selected class. (When it’s selected, the package list is disabled, so remember to toggle it off again to browse packages).
The second, the Class button, allows you to browse the so-called “class-side” (a Smalltalk community naming) members of the class. Class methods and variables are, effectively, like static members you know from other OO languages.
Lastly, the “Com.” or “Comment” button, when toggled, opens another pane next to the code pane that shows the comments (documentation) of the class.
Back to methods: When you click on a method, the code pane at the bottom shows you the code of the method implementation. Usually, these are documented with comments, so you can just read through the code to find out what they do.
So, now that you know the basics of the System Browser, you can spend some time (probably much time) discovering all that the Smalltalk environment has to offer. Note that certain classes are represented by different icons. This is a pretty cool feature; it allows you to identify the function of a class in many cases (e.g. graphical or collection elements, base classes, etc.). I haven’t figured out how these icons are assigned; I will write on that when I do.
Loops and Conditions (Flow Control)
Let’s take a break from the System Browser for a while and talk about how you write useful logic in Smalltalk using loops and conditionals. We’ll use some examples to demonstrate a few. Again, unlike other languages you may be used to, loops and conditionals are not language constructs in Smalltalk. That is, there are no keywords for them; they are in fact messages you send to objects.
Evaluate the following code snippets; inspect the results or just parts of the code to understand what each part evaluates to.
‘If’ Conditions
Suppose we want to branch between options. Evaluate the following:
age := 35.
age > 35
  ifTrue: [ Transcript show: '80s music is the best!' ]
  ifFalse: [ Transcript show: 'What is a flock of seagulls?' ]
What happens here? Well, the ‘>’ (greater than) message, you may have guessed, is a binary message. The result of this message is a Boolean object; in this case the built-in ‘false’. Next, we are sending a message to this Boolean object; each with a block of code to be evaluated depending on the outcome.
(You can open up a System Browser window, navigate to the ‘Objects’ package, and find the Boolean class inside. Look at the messages it defines. Remember when I said keyword messages are like method signatures? You will find the “ifTrue: ifFalse:” and “ifFalse: ifTrue:” messages inside, along with other possible evaluation results (e.g. for only true or only false).)
Loops and repetition
Loops can be handled in a different number of ways. Earlier we saw how to iterate over a collection by sending ‘collect:’ to an Array, which looped over the items in the array, evaluating a given block for each item and passing the item to the block.
The easiest way to repeat something multiple times in Smalltalk is to send timesRepeat: to a number, passing a block of code as the argument. The code will be executed as many times as the value of the number.
10 timesRepeat: [ Transcript show: 'I like Pharo!'; cr ].
(This reads extremely naturally, almost like spoken English!)
You can also create an Interval by sending to: to a number, then sending do: to the resulting Interval, passing a block of code as the argument.
1 to: 5 do: [ :n | Transcript show: 'Mambo number ' , n asString; cr ].
(In the example above you see how to concatenate strings; you can use the ‘,’ (comma), a binary message with which you join a second string to the first).
Instead of while, which you may know from other languages, you can use a Smalltalk block that will evaluate to true or false, and send whileTrue: or whileFalse: to it, passing another block with the code you wish to execute for the duration of the condition:
n := 5.
[ n > 1 ] whileTrue: [ n := n - 1 ].
There are many different ways to do loops but these basic examples should get you started.
Defining Classes and Methods
Whew, this has been a gruelling tutorial, but we’re not done yet! We haven’t even defined our own classes but, fortunately, we’re going to do that now.
In this tutorial I won’t attempt to go into depth to explain object orientation in Smalltalk; I don’t think I am qualified to do that yet and, besides, that would be the subject of a whole tutorial on its own. Here we will just look at the tools and how to accomplish the basics.
Let’s go to the System Browser again (Ctrl + O + B, or use the World menu). We are going to use the System Browser to create a package, create a class inside the package with a method or two and, finally, try out our class in a Playground.
Creating a package
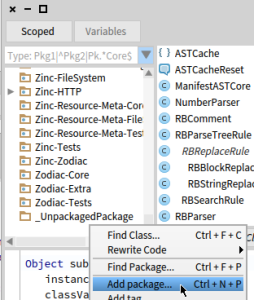
With the System Browser open, right-click (or context-click) on any existing package, or in the empty space below the packages, and choose “Add package…”.
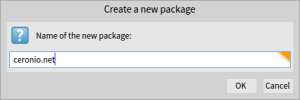
This brings up a dialog in which you can enter the name of your new package. It doesn’t matter; give it any name and click “OK” or press Enter:
Creating a class
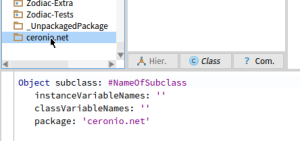
With your new package highlighted, you will notice that in the code pane below, there is a bit of code representing a class definition. This is a piece of template code into which you can type your own values. It has already been pre-populated with the name of your package into which the class definition will be placed.
Here you can put in your own class name, change the super class if you wish and add a list of instance and class variables as you require. (The list of instance variables is just a space-delimited list).
Change the code to look like the following (or just copy and paste):
Object subclass: #MotorCar
  instanceVariableNames: 'speed enginesound'
  classVariableNames: ''
  package: 'ceronio.net'
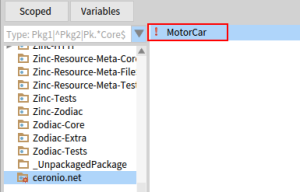
Note how, when you change the contents of the code pane, the orange indicator in the top right showing that the contents have changed. When you right-click and press “Accept”, or just Ctrl+S, the contents of the pane is saved, and you will immediately see the newly created class in the browser.
(Also, observe that in Smalltalk, creation of a new class is not a matter of syntax; there are no keywords to create a class. In Smalltalk, classes are also objects. So, to create a new class we send the ‘subclass’ message to an existing class, which will respond by creating a new subclass).
Adding methods
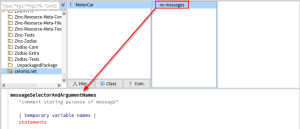
You now have a class, but no methods yet. With your new class highlighted, click on the text that says “no messages” in the next pane. You will see that the code pane below changes, showing you the template code for a new method; the method pattern (it’s not a method name) in bold at the top, followed by a comment string, then a local variable declaration and, finally, the method body.
Replace the template code with the following:
initialize
  "Set a default speed and sound"
  speed := 40.
  enginesound := 'Vroom vroom'.
Now, again, hit “Accept” (Ctrl+S). You will see that, right away, the ‘initialize’ method appears at the top. It is automatically grouped into the ‘initialization’ protocol. This is because it is actually a method that has been defined in a parent class, where it was already grouped like that. Also, the green arrow next to the method indicated that it is actually defined in a super class and that we have overridden it. The ‘initialize’ method is called whenever a new object is created (that is, when you create a new object by sending the ‘new’ message to a class), so it is a convenient place to initialize variables.
Now we will create a second method. Click on the ‘– all –‘ pseudo-protocol (a group containing all the methods of the class) and replace the contents with the following:
drive
  "Make the car go"
  Transcript show: 'Going at ', speed asString, ' km/h - ', enginesound, '!'.
After again accepting the input with Ctrl+S, you will see ‘drive’ listed under the methods, and a new protocol, “as yet unclassified” appearing in the protocol list. We’re not going to worry about creating a new protocol for out new element at this point (maybe in a future tutorial) though you are welcome to play around with the functionality.
Test-driving the class
Let’s take our MotorCar for a spin.
Open a Playground (Ctrl + O + W) and a Transcript (Ctrl + O + T). In the playground, enter the following:
car := MotorCar new.
car drive.
Highlight the code and press Ctrl+D to ‘Do it’. In the Transcript window you should see the text “Going at 40 km/h – Vroom vroom!” appear.
The Morphic UI
Before finishing off this tutorial, I will tell you just a little bit about the user interface.
“Morphic” is the name given to the user interface library/toolkit (call it what you will) that Pharo is built on. All the graphical elements you have interacted with so far, the Playground, Transcript, System Browser and all the elements that make them up (menus, panels, lists, buttons, etc.) are all instances of “morphs” (the classes that make up the elements of the graphical UI).
You can get information, manipulate, and do all sorts of unholy things to any element you see in the environment. Let’s take a look:
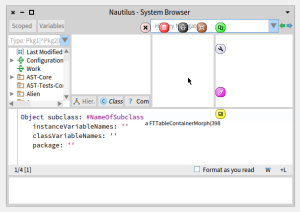
If you hold down Alt and Shift on your keyboard and click on any element on the screen (this is called a “meta-click“), you will see a collection of buttons pop up around it, with a description along the bottom of the element you have highlighted.
This is called the “morphic halo“. It presents you with a number of options to manipulate the element including resizing, rotating (in some instances), recoloring, moving and more.
With each consecutive click, the container elements are selected, allowing you to cycle through all the elements until the topmost container of the window.
One of the most useful features on the morphic halo is the debug button. This is the icon that looks like a wrench. When you click this, you get a menu with a few options, including “inspect morph“, which opens up an Inspector window on the morph for you to examine its properties. Another option on this menu is “browse morph class“, which opens up a browser on the underlying class of the morphic element.
So, apart from allowing you to modify any user interface element, the morphic halo offers a great way to learn about the different types of morphic elements and how they are assembled through inspection. It also demonstrates what I said earlier, namely how the system is a very malleable and introspective environment.
Next Steps
This tutorial has but scratched the surface, but has hopefully been a useful introduction into the world of Smalltalk. Mainly, you should have gained some hands-on, practical experience navigating around the Pharo Smalltalk environment and learning some basics of the language. Moreover, the tools you learned about here give you a good idea of how you can learn more about the system by examining it.
The environment can be very daunting to newcomers (though I think Pharo is less daunting than Squeak) but, with practice and effort, it should provide a productive way to code, for which I will hopefully provide some more detailed tutorials in future.
Further Reading
Make sure to check out some of the resources that I referenced in the writing of this tutorial:
- An extract from Pharo by Example on Smalltalk syntax
- Further information on messages (also from Pharo by Example)
- Information on Smalltalk Objects and Messages (from a very old tutorial)
- Another old Smalltalk overview (not Pharo-specific either)
Also, be sure to check out the following jaw-dropping video by Avdi Grimm, with a focus on the testing tools built into Pharo:Â 7 minutes of Pharo Smalltalk for Rubyists.







Leave a Reply